
I got chunky highlights for the first time back in the early 2000s, when everyone I knew was doing thick, contrasting streaks with a cap and a crochet hook. I hadn’t thought about that haircut in years until I sat down in a colorist’s chair a few months ago, showed her a completely different, modern reference photo, and she said, “oh, this is basically chunky highlights again, just done properly this time.” That comment stuck with me, because it summed up exactly what’s happening with this trend — it’s not a copy-paste return to 2003, it’s the same bold idea executed with much better technique.
Since getting mine redone, I’ve talked to my colorist at length about what actually makes modern chunky highlights different from the original trend, tried a couple of variations myself, and watched a few friends go through the same process with different starting hair colors. Here’s everything worth knowing before you ask for this at your next appointment.
What Are Chunky Highlights, Exactly?
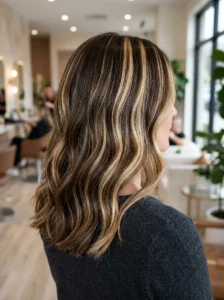
Chunky highlights are thick, clearly visible sections of hair colored noticeably lighter (or occasionally darker) than the surrounding hair, placed with intentional, visible contrast rather than the soft, blended look of highlights like balayage or babylights. The defining feature is the width of each highlighted section — instead of thin, delicate pieces, chunky highlights use broader sections that create real, visible stripes or blocks of contrasting color throughout the hair.
How Modern Chunky Highlights Differ From the Original 2000s Trend
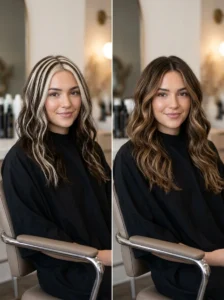
This is the part I found most interesting talking to my colorist, and it comes down to a few specific differences:
- Placement is more deliberate now. The original trend often applied thick highlights fairly uniformly across the whole head. Modern versions tend to concentrate the boldest pieces around the face and top layers, which is more flattering and creates a clearer focal point rather than an all-over striped effect.
- The color itself tends to be warmer or more customized. Early 2000s chunky highlights were often a stark, almost platinum blonde against darker base hair, which read as very high-contrast and, in hindsight, not always the most flattering combination. Modern versions are frequently color-matched more carefully to skin tone, sometimes even using non-blonde tones like copper or caramel for contrast instead of defaulting to platinum every time.
- Technique has improved significantly. Foiling and application methods have gotten more precise, meaning the edges of each highlighted section can be controlled more carefully, avoiding the slightly harsh, unblended line that sometimes characterized the original trend.
- It’s often paired with lower maintenance in mind. Colorists today tend to place chunky pieces in ways that grow out more gracefully, rather than creating an obvious, harsh regrowth line right at the root within a few weeks.
Who This Trend Suits
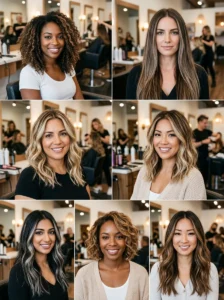
I asked my colorist directly about this, since I wasn’t sure my own hair color and skin tone were a natural fit, and here’s the honest breakdown she gave me.
- Darker base hair colors tend to show the most dramatic, striking contrast with chunky highlights, since the difference between base and highlighted sections is more visually distinct.
- Warmer skin tones generally suit warmer highlight tones — caramel, honey, copper — better than a stark, cool-toned platinum, which can occasionally wash out warmer complexions.
- Cooler skin tones tend to suit ash blonde or cooler-toned highlights, following the same principle in reverse.
- Straight to wavy hair textures show off the visible sections most clearly, since the contrast reads cleanly along smooth or gently waved hair. Very tight curls can still absolutely work with this trend, but the highlighted sections may appear slightly less “blocky” and more blended due to the curl pattern breaking up the visual lines.
The Application Process (What to Expect)
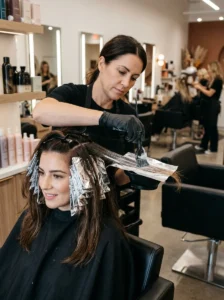
Since a lot of people, myself included the first time around, don’t really know what happens during a chunky highlight appointment, here’s the general process, broken down into what actually happens step by step.
- Consultation and sectioning plan. Your colorist maps out where the thick sections will go, usually concentrating more around the face and crown, before any color touches your hair.
- Foiling the sections. Rather than a cap (an older method used in the original 2000s version of this trend), most colorists now use foils to isolate each chunky section, applying lightener directly to just that piece of hair.
- Processing time. This varies depending on your starting hair color and how much lift is needed to reach the desired highlight shade, generally ranging from twenty minutes to a bit over an hour.
- Toning. Once the highlighted sections are lifted to the right level, a toner is often applied to adjust the exact shade, removing any unwanted brassiness or warmth (or adding it back in, depending on the desired tone).
- Rinse and treatment. A bond-building or deep conditioning treatment is typically applied afterward, since the lightening process needed for noticeable, chunky highlights is more intensive than for very subtle highlights.
Maintenance: What I Wish I’d Known Going In

I underestimated how different the maintenance schedule would be from the soft, blended highlights I’d had in previous years, so here’s what actually applies.
- Root touch-ups are usually needed less often than you’d think, precisely because the bold, thick sections are placed in a way that grows out with some grace rather than immediately looking patchy. My colorist recommended roughly every ten to twelve weeks for me, compared to the eight weeks I was doing with a different, more root-visible color style previously.
- Purple or blue toning shampoo becomes a regular part of the routine if your highlights are blonde-based, since brassiness shows up more visibly against chunky, high-contrast sections than it does in softer, blended highlights.
- A bond-building treatment at home between salon visits helps maintain hair health, since the lightening required for visible, bold highlights is more intensive than subtler coloring techniques.
- Heat protectant becomes non-negotiable. Lightened sections are more vulnerable to heat damage than your natural hair, so I’ve become far more diligent about this since getting mine done.
Styling Chunky Highlights to Show Them Off
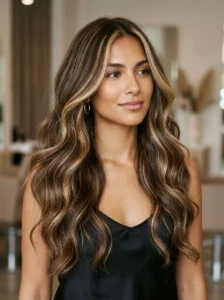
A few things I’ve learned about actually styling hair to make the most of this color technique.
- Loose waves or curls show off the contrast beautifully, since the movement catches and separates the highlighted sections in a way that flat, straight hair sometimes doesn’t emphasize as clearly.
- Half-up styles and ponytails highlight the face-framing sections, which is usually where colorists concentrate the boldest pieces, making these styling choices a good way to show off the color investment.
- A middle or slightly off-center part tends to display symmetrical highlight placement most clearly, though this depends on exactly where your colorist placed the sections.
- Avoid styles that hide too much length or volume, like very tight, sleek buns, if you want the highlights to remain visible — the whole point of chunky highlights is the visible contrast, which gets lost if most of the hair is pulled back tightly out of sight.
Common Mistakes to Avoid
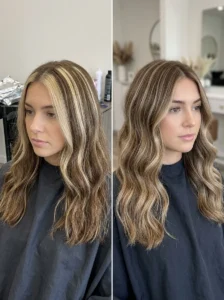
- Going in without a clear reference photo. Chunky highlights can mean different things depending on placement, thickness, and tone, so a specific photo avoids miscommunication about exactly how bold or subtle you want the contrast to be.
- Choosing a highlight tone without considering your skin tone. As covered above, warm and cool undertones suit different highlight shades, and skipping this consideration can result in a color that looks slightly off rather than complementary.
- Underestimating aftercare. Skipping toning shampoo or heat protectant on freshly lightened, chunky sections can lead to brassiness or damage faster than with more subtle highlighting techniques.
- Assuming it only works on blonde or light-base hair. Chunky highlights can be done with a variety of contrasting tones, including on darker hair with warmer or even fashion-color highlights, not just the classic platinum-on-brown combination from the original trend.
- Not discussing placement in detail. Simply asking for “chunky highlights” without specifying face-framing concentration, crown placement, or all-over distribution can result in a look that doesn’t match what you actually pictured.
What to Expect in Terms of Time and Cost
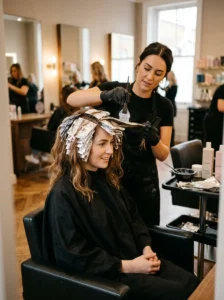
This was something I wish I’d asked about more clearly before my own appointment, since it caught me a little off guard the first time.
- Salon time is generally longer than a standard highlight service, since foiling multiple thick sections and the toning step afterward both add time. My appointment ran close to three hours including the cut and style at the end, compared to roughly two hours for a more subtle, blended highlight service I’d had previously.
- Cost tends to run similar to or slightly above standard foil highlights, since it’s priced by the colorist’s time and the amount of product used rather than by the boldness of the look itself. It’s worth asking directly during a consultation, since pricing structures vary quite a bit between salons.
- A patch test is often recommended beforehand, particularly if it’s your first time being lightened significantly or if you have any history of sensitivity to hair color products. My colorist did this a few days before my actual appointment, just to rule out any reaction ahead of time.
- Booking a consultation separately from the actual color appointment can help avoid running short on time if your colorist needs to do a strand test or discuss placement in detail before committing to the full service.
Frequently Asked Questions
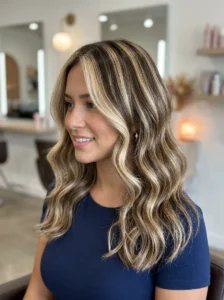
- Is this trend the same as the chunky highlights from the early 2000s? Not exactly. The core idea — thick, visible sections of contrasting color — is the same, but modern application tends to be more strategically placed, better blended at the edges, and often uses warmer or more varied tones rather than the stark platinum-on-brown combination that defined the original version.
- How damaging is this coloring technique compared to regular highlights? Since chunky sections typically require more significant lightening to achieve visible contrast, they can be somewhat more intensive on hair health than very subtle highlights. A good bond-building treatment during the service and consistent aftercare at home help offset this.
- Will chunky highlights work on hair that’s already colored? Yes, though your colorist will need to assess your hair’s current condition and color history to determine how much additional lightening is safe to do in one session, which may mean the boldest version of this look takes more than one appointment to achieve safely.
- How often do I need to go back for touch-ups? Generally every ten to twelve weeks, though this depends on how quickly your natural hair grows and how noticeable you find any regrowth at the root.
- Can I do a subtler version of this trend if I’m nervous about how bold it looks? Yes, and this is actually a common request. Fewer chunky sections, placed only around the face rather than throughout the whole head, gives a softer introduction to the trend without committing to full, all-over contrast right away.
Final Thoughts
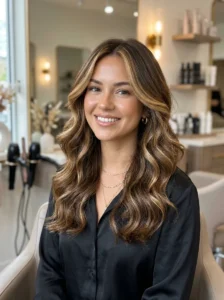
What made me actually go through with this color again, after years of avoiding anything too bold or high-maintenance, was realizing how different the modern execution is from what I remembered. The strategic placement, better color matching to skin tone, and improved application technique make this a genuinely more flattering, more wearable version of a trend I’d written off as a dated relic of a specific era. If your only reference point for chunky highlights is old photos from years ago, it’s worth looking at current examples before ruling the trend out entirely.